Contents
- I. Introduction
- II. General Cleaning Tips for Appliances
- III. Cleaning and Maintaining Kitchen Appliances
- IV. Cleaning and Maintaining Laundry Appliances
- V. Cleaning and Maintaining Bathroom Appliances
- VI. Cleaning and Maintaining Small Appliances
- VII. Tips for Cleaning and Maintaining Electronics
- VIII. Cleaning and Maintaining Outdoor Appliances
- IX. Frequently Asked Questions (FAQs)
- A. How often should I clean my appliances?
- B. Can I use bleach for cleaning appliances?
- C. What is the best way to clean stainless steel appliances?
- D. How do I remove stubborn stains from appliances?
- E. Can I use vinegar for cleaning appliances?
- F. How do I clean appliances without damaging them?
- G. Are there any natural cleaning solutions for appliances?
- H. How do I clean appliances with touchscreens?
- I. Can I use dish soap for cleaning appliances?
- J. How do I maintain the efficiency of my appliances?
I. Introduction
Welcome to the ultimate guide on how to clean and maintain your appliances! In this article, we will provide you with expert tips and tricks to keep your appliances running smoothly and looking their best. Whether you have a refrigerator, dishwasher, washing machine, or any other household appliance, proper maintenance is essential to ensure their longevity and optimal performance.
Appliances are an investment, and taking care of them will not only save you money on repairs but also extend their lifespan. By following our step-by-step instructions, you can prevent common issues and keep your appliances in top shape for years to come.
We understand that cleaning and maintaining appliances can be a daunting task, but don’t worry! We’ve broken down the process into easy-to-follow steps, accompanied by helpful visuals and practical advice. Whether you’re a seasoned homeowner or a first-time appliance owner, this guide is designed to cater to all skill levels.
Throughout this article, we will cover various appliances commonly found in households, including their specific cleaning requirements and maintenance routines. From removing stubborn stains to eliminating unpleasant odors, we’ve got you covered. So, let’s dive in and learn how to keep your appliances sparkling clean and functioning flawlessly!
II. General Cleaning Tips for Appliances

Keeping your appliances clean is essential for their longevity and optimal performance. By following the manufacturer’s instructions, gathering the necessary cleaning supplies, considering safety precautions, and cleaning appliances regularly, you can ensure that they stay in top condition. In this section, we will delve into each of these aspects in detail.
A. Understanding the manufacturer’s instructions
Before you start cleaning any appliance, it is crucial to read and understand the manufacturer’s instructions. These instructions provide valuable insights into the specific cleaning requirements and techniques for each appliance. They may include information about the type of cleaning products to use, any parts that should be removed or avoided during cleaning, and any specific precautions to take.
By following the manufacturer’s instructions, you can avoid damaging the appliance or voiding its warranty. Additionally, you can ensure that you are using the most effective cleaning methods recommended by the experts who designed the appliance.
B. Gathering the necessary cleaning supplies
Once you have familiarized yourself with the manufacturer’s instructions, it’s time to gather the necessary cleaning supplies. The specific supplies you need may vary depending on the type of appliance you are cleaning. However, some common cleaning supplies that are often required include:
- Mild detergent or cleaning solution
- Microfiber cloths or soft sponges
- Vinegar or lemon juice (for natural cleaning)
- Toothbrush or small brush (for hard-to-reach areas)
- Soft-bristle brush or vacuum cleaner (for dusting)
Having these supplies readily available will make the cleaning process more efficient and ensure that you have everything you need to tackle any dirt or grime.
C. Safety precautions to consider
When cleaning appliances, it is essential to prioritize safety. Here are some general safety precautions to consider:
- Always unplug the appliance before cleaning to avoid the risk of electric shock.
- Wear protective gloves to protect your hands from any cleaning chemicals or sharp edges.
- Work in a well-ventilated area to avoid inhaling any fumes from cleaning products.
- Use caution when cleaning around heating elements or electrical components to prevent damage or injury.
By taking these safety precautions, you can ensure that your cleaning process is not only effective but also safe for both you and the appliance.
D. Cleaning frequency for different appliances
The frequency at which you should clean your appliances may vary depending on factors such as usage, environment, and the specific appliance. Here are some general guidelines for cleaning different types of appliances:
| Appliance | Cleaning Frequency |
|---|---|
| Refrigerator | Every 3 months |
| Oven | Every 6 months |
| Dishwasher | Every month |
| Washing Machine | Every month |
| Coffee Maker | Every month |
These are just general recommendations, and you should refer to the manufacturer’s instructions for the specific cleaning frequency of your appliance. Regular cleaning will help prevent the buildup of dirt, grime, and bacteria, ensuring that your appliances continue to function optimally.
By understanding the manufacturer’s instructions, gathering the necessary cleaning supplies, considering safety precautions, and following the recommended cleaning frequency, you can keep your appliances in excellent condition. Regular cleaning not only enhances their performance but also prolongs their lifespan, saving you money in the long run.
III. Cleaning and Maintaining Kitchen Appliances

A. Cleaning the refrigerator
Keeping your refrigerator clean is essential for maintaining its performance and prolonging its lifespan. Here are some steps to follow when cleaning your refrigerator:
- Removing and cleaning shelves and drawers: Start by taking out all the shelves and drawers from your refrigerator. Wash them with warm soapy water and rinse thoroughly. Make sure to dry them completely before placing them back in the refrigerator.
- Defrosting and cleaning the freezer: If your refrigerator has a freezer compartment, it’s important to defrost it regularly. Turn off the freezer and let the ice melt naturally. Once the ice has melted, remove any water and clean the freezer with a mixture of baking soda and water. Wipe it dry before turning it back on.
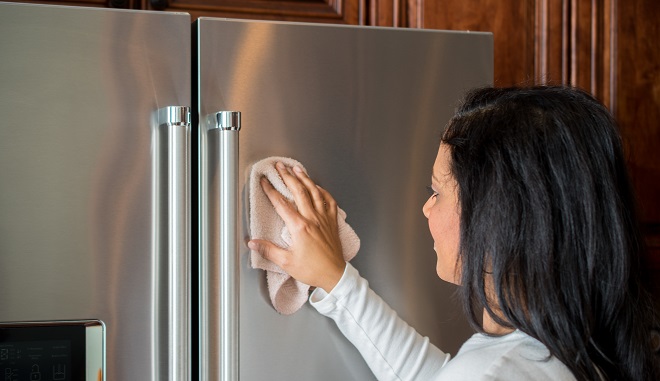
- Cleaning the exterior surfaces: Use a mild detergent and warm water to clean the exterior surfaces of your refrigerator. Pay special attention to the handles and buttons, as they tend to accumulate dirt and grime. Wipe dry with a clean cloth.
B. Maintaining the oven
Regular maintenance of your oven will ensure that it continues to function efficiently and safely. Here’s how you can clean and maintain your oven:
- Cleaning the oven interior: Start by removing any loose debris from the oven. Then, prepare a paste using baking soda and water. Apply the paste to the interior surfaces of the oven, avoiding the heating elements. Let it sit for a few hours or overnight. Scrub the surfaces with a sponge or scrub brush and rinse with water. Wipe dry with a clean cloth.
- Cleaning oven racks and accessories: Remove the oven racks and accessories and soak them in warm soapy water. Use a sponge or scrub brush to remove any stubborn stains or residue. Rinse them thoroughly and dry before placing them back in the oven.
- Cleaning the oven door and exterior: Wipe the oven door and exterior surfaces with a damp cloth and mild detergent. Pay attention to any stains or grease buildup. Rinse with water and wipe dry.
C. Cleaning the dishwasher
Proper maintenance of your dishwasher will ensure that it cleans your dishes effectively and lasts longer. Follow these steps to clean your dishwasher:
- Cleaning the filter and drain: Start by removing the bottom rack of the dishwasher. Locate the filter and remove it. Rinse the filter under running water to remove any debris or food particles. Use a toothbrush or a small brush to clean the filter thoroughly. Check the drain for any clogs and remove them if necessary.
- Removing and cleaning the spray arms: Take out the spray arms from the dishwasher. Rinse them under running water to remove any residue or debris. Use a toothpick or a small brush to clean the spray holes. Make sure they are free from any obstructions before placing them back in the dishwasher.
- Cleaning the dishwasher interior and exterior: Use a damp cloth and mild detergent to wipe the interior and exterior surfaces of the dishwasher. Pay attention to any stains or buildup. Rinse with water and wipe dry.
By following these cleaning and maintenance tips, you can ensure that your kitchen appliances, including the refrigerator, oven, and dishwasher, remain in optimal condition. Regular cleaning and maintenance will not only improve their performance but also extend their lifespan, saving you money in the long run.
IV. Cleaning and Maintaining Laundry Appliances

Properly cleaning and maintaining your laundry appliances is essential to ensure their longevity and optimal performance. Neglecting regular maintenance can lead to issues such as foul odors, mold growth, and reduced efficiency. In this section, we will discuss the steps involved in cleaning and maintaining your washing machine and dryer.
A. Cleaning the Washing Machine
1. Cleaning the Detergent Dispenser:
The detergent dispenser in your washing machine can accumulate residue and become a breeding ground for bacteria. To clean it, start by removing the dispenser from the machine. Soak it in warm, soapy water and scrub away any residue using a soft brush. Rinse thoroughly and allow it to dry completely before reattaching it to the washing machine.
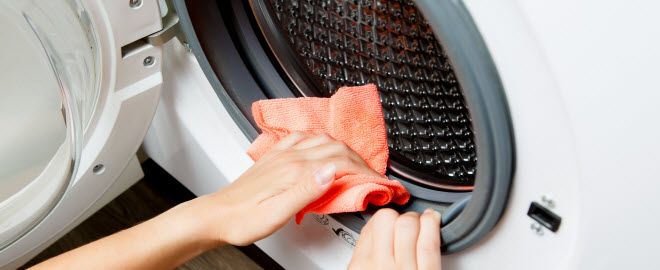
2. Cleaning the Drum and Door Seal:
The drum and door seal of your washing machine can harbor dirt, lint, and mold. To clean them, mix equal parts of water and vinegar in a spray bottle. Spray the solution onto a clean cloth and wipe the drum and door seal thoroughly. Pay special attention to any visible dirt or mold growth. Once done, run a hot water cycle without any clothes to rinse away any remaining residue.
3. Cleaning the Exterior Surfaces:
The exterior surfaces of your washing machine can accumulate dust, dirt, and stains over time. To clean them, mix a mild detergent with warm water and use a soft cloth to wipe down the surfaces. Avoid using abrasive cleaners or scrub brushes, as they can damage the finish. Rinse with clean water and dry with a towel.
B. Maintaining the Dryer
1. Cleaning the Lint Filter:
The lint filter in your dryer should be cleaned after every use to prevent lint buildup, which can be a fire hazard. To clean it, remove the filter from the dryer and remove any lint by hand or with a soft brush. Rinse the filter under running water to remove any remaining debris. Allow it to dry completely before reinserting it into the dryer.
2. Cleaning the Dryer Drum:
The dryer drum can accumulate residue from fabric softeners and dryer sheets, which can affect its performance. To clean it, mix equal parts of water and vinegar in a spray bottle. Spray the solution onto a clean cloth and wipe the drum thoroughly. For stubborn stains, use a mild abrasive cleaner and a non-abrasive sponge. Once cleaned, wipe the drum with a damp cloth to remove any residue.
3. Cleaning the Dryer Vent and Exhaust:
The dryer vent and exhaust can become clogged with lint, reducing the dryer’s efficiency and posing a fire risk. To clean them, start by disconnecting the dryer from the power source. Remove the vent cover and use a vacuum cleaner or a vent brush to remove any lint or debris. Check the exhaust vent outside your home and remove any obstructions. Reattach the vent cover and plug the dryer back in.
Regularly cleaning and maintaining your laundry appliances will not only prolong their lifespan but also ensure that your clothes are cleaned effectively and efficiently. By following these simple steps, you can keep your washing machine and dryer in top condition for years to come.
V. Cleaning and Maintaining Bathroom Appliances
Keeping your bathroom appliances clean and well-maintained is essential for a hygienic and pleasant bathroom environment. In this section, we will discuss the proper cleaning and maintenance techniques for two essential bathroom fixtures: the toilet and the shower.
A. Cleaning the Toilet
1. Using toilet bowl cleaner
To clean the toilet bowl, start by applying a toilet bowl cleaner. Squeeze the cleaner around the rim of the bowl, making sure to cover the entire surface. Allow the cleaner to sit for a few minutes to effectively break down any stains or residue. Then, use a toilet brush to scrub the bowl, paying special attention to the waterline and under the rim. Flush the toilet to rinse away the cleaner and reveal a sparkling clean bowl.
2. Cleaning the toilet tank and handle
While cleaning the toilet bowl is important, it’s equally crucial to clean the toilet tank and handle. Start by turning off the water supply to the toilet. Remove the lid of the tank and pour a toilet cleaner or vinegar solution into the tank. Use a brush or sponge to scrub the inside of the tank, removing any mineral deposits or grime. Don’t forget to clean the handle as well. Once cleaned, turn the water supply back on and flush the toilet a few times to rinse the tank.
3. Cleaning the toilet seat and exterior
Regularly cleaning the toilet seat and exterior is essential for maintaining a clean and germ-free bathroom. Start by wiping down the toilet seat with a disinfectant wipe or a cloth soaked in a mild cleaning solution. Pay attention to the hinges and any hard-to-reach areas. For the exterior of the toilet, use a damp cloth or sponge to wipe away any dirt or stains. Finish off by drying the seat and exterior with a clean towel.
B. Maintaining the Shower
1. Cleaning shower walls and floor
To keep your shower walls and floor clean, it’s important to regularly remove soap scum, mold, and mildew. Start by wetting the walls and floor with warm water. Apply a bathroom cleaner or a mixture of vinegar and water to the surfaces. Use a scrub brush or sponge to scrub away any dirt or stains. Rinse the walls and floor thoroughly with water to remove any cleaner residue. For stubborn stains, you can use a mixture of baking soda and water as a natural scrubbing paste.
2. Cleaning showerheads and faucets
Over time, mineral deposits can build up in your showerhead and faucets, affecting water flow. To clean the showerhead, fill a plastic bag with vinegar and secure it around the showerhead using a rubber band. Leave it overnight to allow the vinegar to dissolve the mineral deposits. In the morning, remove the bag and run hot water through the showerhead to rinse away any remaining residue. For faucets, use a cloth soaked in vinegar to wipe away any mineral deposits.
3. Preventing mold and mildew growth
Mold and mildew thrive in damp environments, making the bathroom an ideal breeding ground. To prevent their growth, make sure your bathroom is well-ventilated. Open windows or use an exhaust fan to reduce moisture levels. After showering, wipe down the walls and floor with a squeegee or towel to remove excess water. Additionally, regularly inspect and repair any leaks or cracks in the shower area to prevent water accumulation.
By following these cleaning and maintenance tips, you can ensure that your bathroom appliances remain clean, functional, and free from any unpleasant odors or stains. Incorporate these practices into your regular cleaning routine to maintain a fresh and inviting bathroom environment.
VI. Cleaning and Maintaining Small Appliances
Cleaning and Maintaining Small Appliances
A. Cleaning the coffee maker
Keeping your coffee maker clean is essential for ensuring that you always enjoy a fresh and flavorful cup of coffee. Here are three important steps to follow when cleaning your coffee maker:
- Cleaning the carafe and filter basket: Start by removing the carafe and filter basket from the coffee maker. Wash them thoroughly with warm, soapy water, ensuring that all coffee residue is removed. Rinse them well and allow them to air dry before placing them back in the coffee maker.
- Descaling the coffee maker: Over time, mineral deposits can build up in your coffee maker, affecting its performance and the taste of your coffee. To descale the coffee maker, mix equal parts of water and white vinegar and pour the mixture into the water reservoir. Run a brew cycle without adding coffee grounds. Repeat this process with clean water to rinse the coffee maker thoroughly.
- Cleaning the exterior surfaces: Wipe the exterior surfaces of the coffee maker with a damp cloth to remove any dust or spills. For stubborn stains, use a mild cleaning solution and a soft brush or sponge. Avoid using abrasive cleaners that could damage the coffee maker’s finish.
B. Maintaining the toaster
Proper maintenance of your toaster will not only ensure its longevity but also prevent the buildup of crumbs and debris that can affect its performance. Follow these steps to maintain your toaster:
- Cleaning the crumb tray: Most toasters have a removable crumb tray located at the bottom. Slide out the crumb tray and empty it into the trash. Wash the crumb tray with warm, soapy water, and dry it thoroughly before placing it back in the toaster.
- Cleaning the toaster slots: To remove any crumbs stuck in the toaster slots, turn the toaster upside down and gently shake it. You can also use a soft brush or a can of compressed air to dislodge any stubborn crumbs. Be sure to unplug the toaster before attempting this.
- Cleaning the exterior surfaces: Wipe the exterior surfaces of the toaster with a damp cloth to remove any fingerprints, stains, or spills. For stubborn stains, use a mild cleaning solution and a soft cloth. Avoid using abrasive cleaners that could scratch the toaster’s surface.
By regularly cleaning and maintaining your small appliances, you can ensure their optimal performance and prolong their lifespan. Follow these simple steps to keep your coffee maker and toaster in excellent condition, allowing you to enjoy your favorite beverages and breakfast treats for years to come.
VII. Tips for Cleaning and Maintaining Electronics
A. Cleaning computer keyboards and mice
Keeping your computer keyboard and mouse clean is essential for optimal performance and hygiene. Here are some tips to help you effectively clean and maintain these devices:
- Start by turning off your computer and unplugging the keyboard and mouse.
- Use a can of compressed air to remove any dust or debris from the keyboard and mouse. Hold the can upright and spray in short bursts to avoid damaging the components.
- For stubborn dirt or grime, use a soft, lint-free cloth slightly dampened with water or a mild cleaning solution. Gently wipe the keys and surfaces, being careful not to let any liquid seep into the keyboard or mouse.
- If the keys are sticky or not functioning properly, you can remove them for a more thorough cleaning. Refer to the manufacturer’s instructions for your specific keyboard model.
- After cleaning, allow the keyboard and mouse to air dry completely before reconnecting them to your computer.
- Regularly clean your keyboard and mouse to prevent the buildup of dirt and bacteria. Aim to clean them at least once a month or more frequently if you notice any issues.
B. Cleaning TV screens and monitors
To maintain the clarity and longevity of your TV screens and monitors, it’s important to clean them properly. Follow these steps to ensure a streak-free and spotless display:
- First, turn off the TV or monitor and unplug it from the power source.
- Use a microfiber cloth or a soft, lint-free cloth to gently wipe the screen. Avoid using paper towels or rough materials that can scratch the surface.
- If there are stubborn smudges or fingerprints, dampen the cloth with a small amount of water or a screen-cleaning solution specifically designed for electronic displays. Be sure to read the instructions on the cleaning solution and apply it sparingly.
- Wipe the screen in a circular motion, applying gentle pressure. Avoid pressing too hard or using excessive force.
- For hard-to-reach areas or edges, use a soft-bristled brush or a cotton swab dipped in the cleaning solution.
- Once you’ve cleaned the screen, use a dry microfiber cloth to remove any remaining moisture or streaks.
- Do not spray any liquid directly onto the screen. Instead, apply it to the cloth first to prevent any moisture from seeping into the device.
- Regularly dust your TV screens and monitors to prevent the accumulation of dirt and debris. Avoid touching the screen with your fingers as the oils from your skin can leave smudges.
C. Cleaning smartphones and tablets
Smartphones and tablets are constantly exposed to dirt, fingerprints, and germs. Follow these steps to keep your devices clean and functioning optimally:
- Start by turning off your device and disconnecting any cables or accessories.
- Use a microfiber cloth or a soft, lint-free cloth to gently wipe the screen and the back of the device. Avoid using abrasive materials that can scratch the surface.
- If there are stubborn smudges or fingerprints, dampen the cloth with a small amount of water or a screen-cleaning solution specifically designed for electronic devices. Apply the solution sparingly and avoid getting any liquid into the device’s openings.
- Gently wipe the screen and the back of the device in a circular motion, applying light pressure. Be careful not to press too hard or use excessive force.
- For hard-to-reach areas or edges, use a soft-bristled brush or a cotton swab dipped in the cleaning solution.
- Once you’ve cleaned the device, use a dry microfiber cloth to remove any remaining moisture or streaks.
- Regularly clean your smartphone and tablet to prevent the buildup of dirt, oils, and bacteria. Aim to clean them at least once a week or more frequently if you use them extensively.
- Consider using a screen protector and a protective case to minimize the risk of scratches and damage to your device.
By following these tips, you can ensure that your computer keyboards, mice, TV screens, monitors, smartphones, and tablets remain clean, well-maintained, and in optimal working condition. Remember to always refer to the manufacturer’s instructions for specific cleaning recommendations for your devices.
VIII. Cleaning and Maintaining Outdoor Appliances
Outdoor appliances such as grills and lawn mowers require regular cleaning and maintenance to ensure they function optimally and have a longer lifespan. In this section, we will discuss the proper cleaning and maintenance techniques for two common outdoor appliances: the grill and the lawn mower.
A. Cleaning the grill
1. Cleaning the grates and burners
Start by removing the grates and burners from the grill. Use a wire brush to scrub off any food residue or grease that has accumulated on the grates. For stubborn stains, you can soak the grates in warm soapy water before scrubbing. Rinse the grates thoroughly and let them dry before placing them back in the grill.
Clean the burners by gently brushing off any debris or grease using a soft brush. Be careful not to damage the burners while cleaning. If the burners are clogged, use a small wire or a pin to unclog the openings. Make sure the burners are completely dry before reattaching them to the grill.
2. Cleaning the grill interior and exterior
To clean the interior of the grill, remove any leftover ashes or debris from previous grilling sessions. Use a grill brush or a damp cloth to wipe down the interior surfaces, including the walls and the bottom of the grill. For stubborn stains or grease buildup, you can use a mild detergent or a grill cleaner. Rinse the interior thoroughly and let it dry before using the grill again.
For the exterior of the grill, use a damp cloth or sponge to wipe down the surfaces. If there are any stubborn stains or grease, you can use a mild detergent or a stainless steel cleaner. Avoid using abrasive cleaners or scrub brushes that can scratch the surface of the grill. Rinse the exterior thoroughly and dry it with a clean cloth.
3. Removing grease and carbon buildup
Greasiness and carbon buildup can affect the performance of your grill and even pose a fire hazard. To remove grease and carbon buildup, you can use a grill degreaser or a mixture of baking soda and water. Apply the degreaser or baking soda paste to the affected areas and let it sit for a few minutes. Scrub the areas with a brush or sponge, then rinse thoroughly. Repeat the process if necessary.
B. Maintaining the lawn mower
1. Cleaning the mower deck
Regular cleaning of the mower deck is essential to prevent grass clippings and debris from clogging the blades and affecting the mower’s performance. Start by disconnecting the spark plug wire to ensure the mower is not accidentally started. Use a brush or a scraper to remove any grass clippings or debris from the mower deck. Pay extra attention to the areas around the blades and the discharge chute. Once the deck is clean, reattach the spark plug wire.
2. Changing the oil and air filter
Changing the oil and air filter regularly is crucial for maintaining the engine’s performance and prolonging its lifespan. Refer to the mower’s manual for specific instructions on how to change the oil and air filter. Typically, you will need to drain the old oil, replace the oil filter, and refill the engine with fresh oil. Similarly, the air filter should be replaced according to the manufacturer’s recommendations or when it becomes dirty or clogged.
3. Sharpening the mower blades
Dull mower blades can tear the grass instead of cutting it cleanly, resulting in an uneven and unhealthy lawn. Regularly inspect the mower blades for signs of wear or damage. If the blades are dull or damaged, they will need to be sharpened or replaced. You can sharpen the blades yourself using a file or a grinder, or you can take them to a professional for sharpening. Remember to disconnect the spark plug wire before removing the blades for sharpening.
By following these cleaning and maintenance tips for your outdoor appliances, you can ensure they remain in top condition and provide you with years of reliable service. Regular cleaning and maintenance not only improve the performance and lifespan of the appliances but also contribute to a safer and more enjoyable outdoor experience.
IX. Frequently Asked Questions (FAQs)
A. How often should I clean my appliances?
As an expert in appliance maintenance, I highly recommend cleaning your appliances regularly to ensure their optimal performance and longevity. The frequency of cleaning will depend on the type of appliance and how frequently it is used. For appliances that are used daily, such as refrigerators and ovens, it is best to clean them once a month. However, for appliances that are used less frequently, such as dishwashers and washing machines, a deep clean every three to six months should suffice.
B. Can I use bleach for cleaning appliances?
While bleach is a powerful disinfectant, it is not recommended for cleaning most appliances. Bleach can be too harsh and corrosive, especially on surfaces like stainless steel or plastic. Instead, opt for milder cleaning solutions that are specifically designed for appliance cleaning. These solutions are gentle enough to remove dirt and grime without causing any damage to the appliance.
C. What is the best way to clean stainless steel appliances?
Stainless steel appliances are known for their sleek and modern look, but they can be prone to fingerprints and smudges. To clean stainless steel appliances, start by wiping the surface with a soft, damp cloth to remove any loose dirt or debris. Then, use a mild detergent or stainless steel cleaner to gently scrub the surface in the direction of the grain. Avoid using abrasive cleaners or scrub brushes, as they can scratch the stainless steel. Finally, rinse the surface with clean water and dry it thoroughly with a soft cloth to prevent water spots.
D. How do I remove stubborn stains from appliances?
If you’re dealing with stubborn stains on your appliances, there are a few tricks you can try. For greasy stains, mix equal parts vinegar and water in a spray bottle and spray the affected area. Let it sit for a few minutes, then wipe it away with a clean cloth. For mineral deposits or hard water stains, make a paste using baking soda and water and apply it to the stain. Let it sit for a few minutes, then scrub it gently with a soft brush or sponge. Rinse the area with clean water and dry it thoroughly.
E. Can I use vinegar for cleaning appliances?
Vinegar is a versatile and natural cleaning agent that can be used to clean many household appliances. Its acidic properties make it effective in removing grease, grime, and mineral deposits. To clean with vinegar, mix equal parts vinegar and water in a spray bottle and spray the solution onto the surface of the appliance. Let it sit for a few minutes, then wipe it away with a clean cloth. However, be cautious when using vinegar on appliances with sensitive surfaces, such as marble or granite, as it can cause damage.
F. How do I clean appliances without damaging them?
Cleaning appliances without causing damage requires using the right cleaning products and techniques. Avoid using abrasive cleaners, harsh chemicals, or rough scrub brushes, as they can scratch or corrode the appliance’s surfaces. Instead, opt for mild detergents, natural cleaning solutions, or appliance-specific cleaners. When cleaning, use soft cloths or sponges to gently wipe the surfaces. Additionally, always read the manufacturer’s instructions and recommendations for cleaning and maintenance to ensure you are using the appropriate methods for your specific appliance.
G. Are there any natural cleaning solutions for appliances?
Yes, there are several natural cleaning solutions that can be used to clean appliances effectively. For example, a mixture of baking soda and water can be used as a gentle abrasive cleaner for removing stains and odors. Lemon juice is also a great natural cleaner that can be used to remove grease and grime. Additionally, white vinegar can be used to clean and disinfect appliances. These natural cleaning solutions are not only effective but also safer for the environment and your health.
H. How do I clean appliances with touchscreens?
Cleaning appliances with touchscreens requires a delicate approach to avoid damaging the sensitive screen. Start by turning off the appliance and unplugging it from the power source. Then, use a soft, lint-free cloth slightly dampened with water or a mild cleaning solution to gently wipe the touchscreen. Avoid using excessive moisture, as it can seep into the device and cause damage. If there are stubborn smudges or fingerprints, you can use a touchscreen cleaning kit or a microfiber cloth specifically designed for electronic devices. Always refer to the manufacturer’s instructions for cleaning touchscreens to ensure you are using the correct methods.
I. Can I use dish soap for cleaning appliances?
Yes, dish soap can be used for cleaning appliances, especially for removing grease and grime. However, it is important to dilute the dish soap with water to avoid leaving behind a soapy residue. Mix a small amount of dish soap with warm water in a bucket or sink. Dip a sponge or cloth into the soapy water and use it to clean the appliance’s surfaces. Rinse the appliance with clean water and dry it thoroughly with a soft cloth to prevent water spots or streaks.
J. How do I maintain the efficiency of my appliances?
Maintaining the efficiency of your appliances is crucial for their optimal performance and energy savings. Here are a few tips to help you keep your appliances running efficiently:
- Regularly clean and remove any dirt or debris from the appliance’s filters, vents, and coils.
- Check and replace the appliance’s seals or gaskets if they are worn or damaged.
- Follow the manufacturer’s instructions for proper use and maintenance of the appliance.
- Avoid overloading the appliance, as it can strain the motor and reduce efficiency.
- Consider scheduling regular professional maintenance for complex appliances like HVAC systems or refrigerators.
By following these maintenance tips, you can prolong the lifespan of your appliances and ensure they continue to operate efficiently.