Contents
- I. Introduction
- II. Selecting the Right Herbs for Your Kitchen Garden
- III. Planning and Designing Your Kitchen Garden
- IV. Preparing the Soil for Herb Planting
- V. Starting Herbs from Seeds
- VI. Propagating Herbs from Cuttings
- VII. Transplanting Herb Seedlings or Established Plants
- VIII. Providing the Right Growing Conditions for Herbs
- IX. Fertilizing and Mulching Your Herb Garden
- A. Understanding herb nutrient requirements
- B. Choosing the right fertilizer for herbs
- C. Mulching techniques to conserve moisture and suppress weeds
- A. Importance of pruning for herb growth and health
- B. Techniques for proper herb pruning
- C. Harvesting herbs at the right time for optimal flavor and potency
I. Introduction
:strip_icc()/window-hanging-herb-planter-05014de0-c912aa196673407ea37d5ff6dbc7bcda.jpg)
Welcome to the world of kitchen gardening! Growing and caring for herbs in your own kitchen garden can be a rewarding and fulfilling experience. Not only do herbs add flavor and aroma to your dishes, but they also offer a range of health benefits. Whether you have a spacious backyard or a small balcony, you can easily create a thriving herb garden right in your own home.
In this article, we will guide you through the process of growing and caring for herbs in your kitchen garden. We will cover everything from selecting the right herbs to planting, watering, and harvesting them. Whether you are a seasoned gardener or a beginner, this comprehensive guide will provide you with all the information you need to successfully grow and care for herbs.
Throughout this article, we will explore various types of herbs, their specific requirements, and the best practices for maintaining a healthy and productive herb garden. We will also discuss common challenges that gardeners may face and provide practical tips to overcome them.
So, if you are ready to embark on a journey of flavors and fragrances, let’s dive in and discover the wonderful world of growing and caring for herbs in your kitchen garden!
II. Selecting the Right Herbs for Your Kitchen Garden
When it comes to growing herbs in your kitchen garden, selecting the right ones can make all the difference. Whether you’re looking to enhance the flavors of your dishes or explore the medicinal properties of herbs, choosing the right varieties is essential. In this section, we will discuss popular culinary herbs, medicinal herbs to consider growing, and factors to consider when choosing herbs for your garden.
A. Popular Culinary Herbs for Kitchen Gardens
1. Basil: Known for its aromatic leaves, basil is a staple in many kitchens. It comes in various varieties, including sweet basil, Thai basil, and lemon basil. Basil is perfect for adding a fresh and vibrant flavor to pasta dishes, salads, and even cocktails.
2. Rosemary: This woody herb is known for its strong and distinct flavor. It pairs well with roasted meats, potatoes, and vegetables. Rosemary is also a great addition to homemade bread and infused oils.
3. Thyme: With its earthy and slightly minty flavor, thyme is a versatile herb that complements a wide range of dishes. It is commonly used in soups, stews, marinades, and roasted vegetables.
4. Parsley: Often used as a garnish, parsley is more than just a pretty herb. It adds a fresh and slightly peppery taste to salads, sauces, and marinades. Flat-leaf parsley is preferred for its stronger flavor compared to curly parsley.
5. Mint: Mint is a refreshing herb that adds a burst of flavor to both sweet and savory dishes. It is commonly used in salads, drinks, desserts, and even savory dishes like lamb or pea soup.
6. Chives: Chives are a member of the onion family and have a mild onion flavor. They are often used as a garnish for baked potatoes, soups, and salads. Chives can also be used in compound butters and creamy sauces.
B. Medicinal Herbs to Consider Growing
1. Lavender: Known for its calming properties, lavender is a popular medicinal herb. It can be used to make soothing teas, essential oils, and even bath products. Lavender is also believed to have antiseptic and anti-inflammatory properties.
2. Chamomile: Chamomile is well-known for its calming and sleep-inducing effects. It can be brewed into a tea to help with relaxation and promote better sleep. Chamomile is also used topically to soothe skin irritations.
3. Echinacea: Echinacea is a powerful herb that is believed to boost the immune system and help fight off colds and flu. It can be consumed as a tea or taken in supplement form. Echinacea is also used topically to treat wounds and skin infections.
4. Calendula: Calendula is a bright and cheerful flower that has numerous medicinal properties. It is often used in creams, ointments, and salves to soothe skin irritations, promote wound healing, and reduce inflammation.
5. Peppermint: Peppermint is not only a culinary herb but also a medicinal one. It is commonly used to relieve digestive issues such as indigestion, bloating, and nausea. Peppermint tea is a popular remedy for soothing an upset stomach.
C. Factors to Consider When Choosing Herbs for Your Garden
1. Climate and Growing Conditions: Different herbs thrive in different climates and growing conditions. Consider the temperature, sunlight, and soil requirements of each herb before selecting them for your garden. Some herbs may require full sun, while others prefer partial shade.
2. Space and Size: Take into account the space available in your garden and the size of each herb when fully grown. Some herbs, like mint, can spread rapidly and may require containment to prevent them from taking over the garden.
3. Usage and Preference: Consider how you plan to use the herbs in your cooking or for medicinal purposes. Choose herbs that you enjoy the taste of and will use frequently in your recipes. It’s also worth considering herbs that have multiple uses and can be used in various dishes.
4. Maintenance and Care: Some herbs require more care and attention than others. Consider your gardening skills and the amount of time you can dedicate to maintaining your herb garden. Some herbs may require regular pruning, fertilizing, or protection from pests.
By carefully selecting the right herbs for your kitchen garden, you can create a thriving and aromatic oasis right outside your door. Whether you’re a culinary enthusiast or interested in exploring the medicinal properties of herbs, growing your own herbs can be a rewarding and fulfilling experience.
III. Planning and Designing Your Kitchen Garden
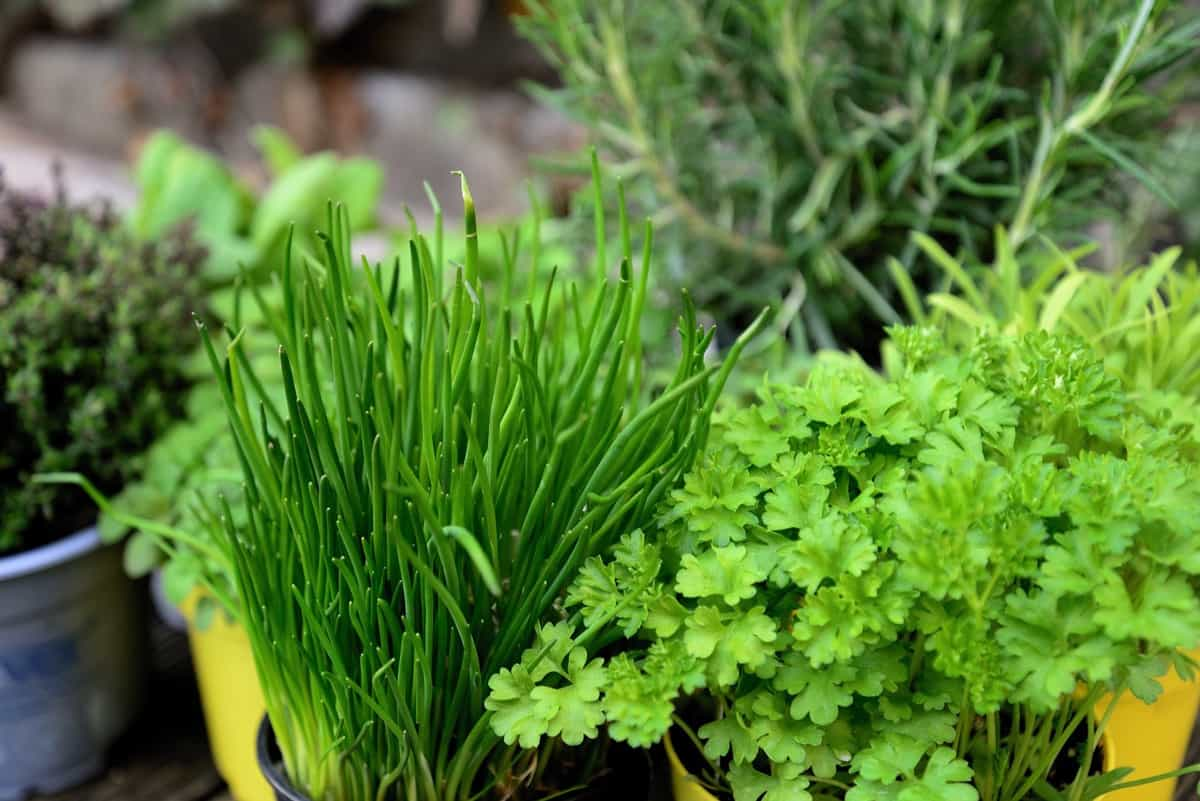
:strip_icc()/various-potted-herbs-small-nursery-pots-3vd-wxKTKIw96tUUdGVmYO-a31a54de7f844a3fa13e2654338241e5.jpg)
Planning and designing your kitchen garden is an essential step in creating a thriving herb garden. By assessing available space and sunlight, choosing the right containers or raised beds, and designing a layout for optimal growth and accessibility, you can ensure that your herbs flourish and provide you with a bountiful harvest. In this section, we will explore each of these aspects in detail to help you create a successful kitchen garden.
A. Assessing available space and sunlight
Before you start planning your kitchen garden, it’s important to assess the available space and sunlight in your chosen location. Most herbs require at least 6 hours of direct sunlight per day, so choose a spot that receives ample sunlight throughout the day. Observe the area at different times to determine how much shade it receives and if there are any obstructions that may block sunlight.
Additionally, consider the size of your space and the number of herbs you wish to grow. If you have limited space, you can opt for vertical gardening or utilize windowsills and hanging baskets to maximize your growing area. On the other hand, if you have a larger space, you can plan for a more extensive herb garden with multiple beds or containers.
Take note of any existing structures or features in your garden, such as trees, fences, or walls, as they can impact the amount of sunlight your herbs receive. Ensure that your herbs have enough space to grow and thrive without being overshadowed by taller plants or structures.
B. Choosing the right containers or raised beds
When it comes to choosing containers or raised beds for your kitchen garden, there are several factors to consider. The type of container or bed you choose will depend on the available space, your gardening preferences, and the specific needs of your herbs.
If you have limited space or want the flexibility to move your herbs around, containers are a great option. Choose containers that are deep enough to accommodate the root systems of your herbs and have drainage holes to prevent waterlogging. You can use various materials such as terracotta, plastic, or wooden containers, depending on your aesthetic preferences and budget.
Raised beds, on the other hand, offer several advantages, especially if you have poor soil quality or limited mobility. They provide better drainage, prevent soil compaction, and make it easier to tend to your herbs. When constructing raised beds, ensure they are at least 6-8 inches deep and use untreated wood or other safe materials to avoid any chemical leaching into the soil.
Consider the size of your containers or raised beds based on the mature size of your herbs. Some herbs, like basil or parsley, require more space to spread out, while others, like thyme or rosemary, can thrive in smaller containers. It’s important to provide enough room for each herb to grow and avoid overcrowding, which can lead to poor airflow and increased risk of diseases.
C. Designing a layout for optimal growth and accessibility
Designing a layout for your kitchen garden is crucial to ensure optimal growth and accessibility. By considering the growth habits, sunlight requirements, and companion planting preferences of your herbs, you can create a harmonious and productive garden.
Start by arranging your herbs based on their height, with taller herbs placed towards the back and shorter herbs towards the front. This will prevent taller herbs from shading out smaller ones and ensure that each herb receives adequate sunlight. You can also create visual interest by alternating different heights and textures.
Take into account the growth habits of your herbs, such as spreading or clumping, and provide enough space between them to avoid overcrowding. This will allow for better airflow and reduce the risk of diseases. Consider using companion planting techniques, where certain herbs are grown together to enhance each other’s growth and repel pests.
Accessibility is another important aspect to consider when designing your kitchen garden. Leave enough space between beds or containers to allow for easy movement and maintenance. Consider pathways or stepping stones to provide access to all areas of your garden, especially if you have larger beds or multiple containers.
Remember to regularly assess and adjust your garden layout as your herbs grow and mature. Prune or harvest herbs as needed to maintain their shape and prevent overcrowding. By planning and designing your kitchen garden thoughtfully, you can create a beautiful and functional space that will provide you with fresh herbs for culinary delights and natural remedies.
IV. Preparing the Soil for Herb Planting
:max_bytes(150000):strip_icc()/GettyImages-155375407_1-d2460c111f8249c79e212461e526851d.jpg)
When it comes to growing herbs in your kitchen garden, one of the most crucial steps is preparing the soil. The quality of the soil plays a significant role in the growth and health of your herbs. In this section, we will explore the importance of soil quality, testing and amending the soil, and organic soil preparation methods for kitchen gardens.
A. Understanding the Importance of Soil Quality
The first step in preparing the soil for herb planting is understanding the importance of soil quality. Good soil quality provides the necessary nutrients, moisture retention, and drainage that herbs need to thrive. It creates a favorable environment for the roots to grow and absorb nutrients effectively.
There are a few key factors to consider when assessing soil quality:
- Texture: The texture of the soil refers to the relative proportions of sand, silt, and clay. Ideally, herb plants prefer a loamy soil texture, which is a balanced combination of these three components. Loamy soil provides good drainage while retaining enough moisture for the plants.
The pH level of the soil determines its acidity or alkalinity. Most herbs prefer a slightly acidic to neutral pH range of 6.0 to 7.0. Testing the soil pH will help you determine if any amendments are necessary to adjust the pH level. - Organic Matter: The presence of organic matter in the soil is vital for its fertility and nutrient content. Organic matter improves the soil structure, enhances water retention, and promotes beneficial microbial activity. Adding compost or well-rotted manure can increase the organic matter content in the soil.
By understanding these soil quality factors, you can make informed decisions about how to improve your soil for herb cultivation.
B. Testing and Amending the Soil for Herb Cultivation
Before planting your herbs, it is essential to test the soil to determine its nutrient levels and pH. Soil testing kits are readily available at garden centers or can be done through a professional soil testing service. The test results will provide valuable insights into the current state of your soil and any necessary amendments.
Based on the test results, you may need to amend the soil to optimize its nutrient content and pH level. Common soil amendments for herb cultivation include:
- Compost: Adding compost to the soil improves its structure, fertility, and moisture retention. Compost is rich in organic matter and provides a slow-release source of nutrients for the herbs.
- Organic Fertilizers: If the soil lacks specific nutrients, organic fertilizers can be used to supplement them. Choose fertilizers that are specifically formulated for herb gardens and follow the recommended application rates.
- Lime or Sulfur: To adjust the soil pH, you can add lime to raise it or sulfur to lower it. The amount required will depend on the current pH level and the target pH for your herbs.
It is important to follow the instructions provided with the amendments and apply them in the recommended quantities. Over-amending the soil can lead to nutrient imbalances or pH extremes, which can negatively impact herb growth.
C. Organic Soil Preparation Methods for Kitchen Gardens
If you prefer organic gardening methods, there are several techniques you can use to prepare the soil for herb cultivation:
- Sheet Mulching: Sheet mulching involves layering organic materials, such as cardboard, newspaper, or straw, over the soil surface. This helps suppress weeds, retain moisture, and gradually improve the soil as the organic materials break down.
- Green Manure Cover Crops: Planting cover crops, such as clover or buckwheat, during the off-season can help improve soil fertility and structure. These plants fix nitrogen from the air and add organic matter when tilled into the soil.
- Crop Rotation: Rotating your herb plants with different crops each season can help break pest and disease cycles and maintain soil health. It also prevents the depletion of specific nutrients by varying the plants’ nutrient requirements.
By incorporating these organic soil preparation methods, you can create a sustainable and nutrient-rich environment for your herbs to thrive.
V. Starting Herbs from Seeds
Starting herbs from seeds is a rewarding and cost-effective way to grow a variety of herbs in your kitchen garden. Not only does it give you complete control over the growing process, but it also allows you to choose from a wider selection of herb varieties. In this section, we will explore the benefits of starting herbs from seeds, the steps for successful seed starting, and some tips for caring for herb seedlings.
A. Benefits of starting herbs from seeds
1. Wide variety of herb choices: When you start herbs from seeds, you have access to a much wider variety of herbs compared to buying established plants. This opens up a world of possibilities and allows you to experiment with different flavors and aromas in your cooking.
2. Cost-effective: Starting herbs from seeds is a cost-effective way to grow your own herbs. Seeds are generally less expensive than buying established plants, and you can save even more money by collecting and storing seeds from your own herb plants for future use.
3. Control over the growing process: By starting herbs from seeds, you have complete control over the growing process. You can choose organic seeds, control the quality of the soil and fertilizers used, and ensure that no harmful chemicals or pesticides are used in the growing process.
4. Educational experience: Starting herbs from seeds can be a great educational experience, especially for children. It teaches them about the life cycle of plants, the importance of nurturing and caring for living things, and the joy of harvesting their own herbs.
B. Steps for successful seed starting
1. Choose the right seeds: Select high-quality seeds from reputable sources. Look for seeds that are specifically labeled for herb gardening and check the expiration date to ensure their viability.
2. Prepare the growing containers: Use clean and sterile containers to prevent the growth of mold and diseases. You can use seed trays, peat pots, or recycled containers with drainage holes at the bottom.
3. Prepare the soil: Use a well-draining potting mix that is rich in organic matter. Avoid using garden soil, as it may contain pests, diseases, or weed seeds. Moisten the soil before planting the seeds.
4. Plant the seeds: Follow the instructions on the seed packet for the recommended planting depth and spacing. Gently press the seeds into the soil and cover them with a thin layer of soil or vermiculite.
5. Provide the right conditions: Place the containers in a warm and well-lit area, such as a sunny windowsill or a greenhouse. Maintain a consistent temperature of around 70-75°F (21-24°C) and provide 12-16 hours of light per day using grow lights if necessary.
6. Water and fertilize: Keep the soil evenly moist but not waterlogged. Water the seedlings from the bottom to avoid disturbing the delicate roots. Once the seedlings have developed their first true leaves, start fertilizing them with a diluted organic fertilizer.
7. Harden off the seedlings: Before transplanting the seedlings outdoors, gradually expose them to outdoor conditions over a period of 7-10 days. Start with a few hours of outdoor exposure in a sheltered location and gradually increase the duration and intensity of exposure.
C. Tips for caring for herb seedlings
1. Transplant at the right time: Wait until the seedlings have developed a strong root system and are at least 2-3 inches tall before transplanting them into the garden or larger containers. This will give them a better chance of survival.
2. Choose the right location: Most herbs prefer full sun, so choose a sunny spot in your garden or place them in a sunny location indoors. Ensure that the soil is well-draining and amend it with organic matter if necessary.
3. Water properly: Water the herb seedlings regularly, keeping the soil evenly moist but not waterlogged. Avoid overhead watering, as it can lead to fungal diseases. Water at the base of the plants to prevent wetting the foliage.
4. Provide support if needed: Some herb varieties, such as tall basil or climbing vines like thyme, may require support as they grow. Use stakes, trellises, or cages to provide support and prevent the plants from falling over.
5. Harvest regularly: As the herb seedlings grow, start harvesting the leaves regularly to encourage bushier growth. This will also ensure that you have a fresh supply of herbs for your culinary needs.
Starting herbs from seeds is a rewarding and fulfilling experience that allows you to grow a wide variety of herbs in your kitchen garden. By following the steps for successful seed starting and implementing the tips for caring for herb seedlings, you can enjoy a bountiful harvest of fresh and flavorful herbs throughout the year.
VI. Propagating Herbs from Cuttings
Propagating herbs from cuttings is a simple and effective way to expand your herb garden. Not only does it allow you to grow more plants without spending a lot of money, but it also ensures that you have a constant supply of fresh herbs for your culinary needs. In this section, we will explore the advantages of propagating herbs from cuttings, the techniques for taking and rooting herb cuttings, and how to care for newly propagated herb plants.
A. Advantages of propagating herbs from cuttings
There are several advantages to propagating herbs from cuttings. Firstly, it is a cost-effective method as it eliminates the need to purchase new plants or seeds. By using cuttings from existing herb plants, you can create multiple new plants without spending any extra money. This is particularly beneficial if you have limited gardening space or a tight budget.
Secondly, propagating herbs from cuttings ensures that the new plants will have the same characteristics as the parent plant. This is important if you have a specific variety of herb that you want to preserve. By taking cuttings from the desired plant, you can ensure that the new plants will have the same flavor, aroma, and appearance.
Thirdly, propagating herbs from cuttings allows you to control the quality of the plants. When you purchase plants from a nursery or garden center, you may not know how they were grown or treated. By propagating your own herbs, you have full control over the growing conditions, ensuring that the plants are healthy and free from any pesticides or chemicals.
Lastly, propagating herbs from cuttings is a rewarding process. It allows you to witness the growth and development of the new plants from start to finish. This hands-on approach to gardening can be a fulfilling experience and can deepen your connection with nature.
B. Techniques for taking and rooting herb cuttings
When taking herb cuttings, it is important to choose healthy and disease-free plants. Look for plants that have strong stems and vibrant leaves. Avoid plants that show signs of pests or diseases, as these can affect the success of the cuttings.
Here are the steps to take and root herb cuttings:
- Prepare a clean and sharp pair of pruning shears or scissors.
- Select a stem that is about 4 to 6 inches long and has several sets of leaves.
- Make a clean cut just below a set of leaves, ensuring that the cutting is not too long or too short.
- Remove the lower set of leaves, leaving only a few sets at the top.
- Dip the cut end of the stem in a rooting hormone powder to promote root growth.
- Prepare a pot or container filled with a well-draining potting mix.
- Make a small hole in the potting mix and insert the cutting, ensuring that at least one set of leaves is above the soil surface.
- Water the cutting thoroughly and place it in a warm and bright location, away from direct sunlight.
- Maintain the moisture level of the potting mix by watering whenever it feels dry to the touch.
- After a few weeks, the cutting should develop roots and can be transplanted into a larger pot or directly into the garden.
C. Caring for newly propagated herb plants
Once the herb cuttings have rooted and are ready for transplanting, it is important to provide them with the proper care to ensure their survival and growth.
Here are some tips for caring for newly propagated herb plants:
- Transplant the rooted cuttings into well-prepared soil or pots with good drainage.
- Water the plants regularly, keeping the soil evenly moist but not waterlogged.
- Provide the plants with sufficient sunlight or artificial light if growing indoors.
- Fertilize the plants with a balanced organic fertilizer to promote healthy growth.
- Monitor the plants for any signs of pests or diseases and take appropriate action if necessary.
- Harvest the herbs regularly to encourage bushier growth and to enjoy fresh herbs in your cooking.
By following these techniques and caring for your newly propagated herb plants, you can enjoy a thriving herb garden that provides you with a constant supply of fresh and flavorful herbs.
VII. Transplanting Herb Seedlings or Established Plants
Transplanting herb seedlings or established plants is an essential step in the process of growing and caring for herbs in your kitchen garden. Whether you are starting from seeds or have purchased established plants, proper transplanting techniques will ensure their successful growth and minimize transplant shock. In this section, we will discuss when and how to transplant herb seedlings, transplanting established herb plants, and provide tips for minimizing transplant shock.
A. When and how to transplant herb seedlings
Transplanting herb seedlings should be done when they have developed a strong root system and have at least two sets of true leaves. This usually occurs about 4-6 weeks after sowing the seeds. Before transplanting, it is important to prepare the soil by loosening it and removing any weeds or debris. Here are the steps to transplant herb seedlings:
- Gently remove the seedlings from their original container, being careful not to damage the roots.
- Dig a hole in the prepared soil that is slightly larger than the root ball of the seedling.
- Place the seedling in the hole, making sure the top of the root ball is level with the soil surface.
- Backfill the hole with soil, gently firming it around the seedling to eliminate any air pockets.
- Water the transplanted seedlings thoroughly to help settle the soil and provide moisture.
It is important to choose a suitable location for transplanting herb seedlings. Most herbs prefer full sun, so select a spot in your garden that receives at least 6-8 hours of direct sunlight per day. Additionally, consider the spacing requirements of each herb variety to ensure they have enough room to grow and thrive.
B. Transplanting established herb plants
If you have purchased established herb plants from a nursery or garden center, they may need to be transplanted into larger containers or directly into your garden. Here’s how to transplant established herb plants:
- Choose a container or garden location that provides adequate space for the herb’s growth.
- Prepare the soil by loosening it and removing any weeds or debris.
- Gently remove the herb plant from its original container, being careful not to damage the roots.
- Place the plant in the new container or hole, making sure it is at the same level as it was in the original container.
- Backfill the container or hole with soil, gently firming it around the plant.
- Water the transplanted herb plant thoroughly to help settle the soil and provide moisture.
When transplanting established herb plants, it is important to handle them with care to avoid damaging the roots. Water the plants well before transplanting to ensure they are adequately hydrated.
C. Tips for minimizing transplant shock
Transplant shock can occur when plants are moved from one location to another, causing stress and potentially hindering their growth. Here are some tips to minimize transplant shock when transplanting herb seedlings or established plants:
- Water the plants thoroughly before and after transplanting to ensure they are well-hydrated.
- Choose a suitable transplanting time, such as early morning or late afternoon, to avoid exposing the plants to extreme heat.
- Handle the plants with care, avoiding damage to the roots or stems.
- Provide shade or temporary protection for the transplanted plants to shield them from direct sunlight or harsh weather conditions.
- Monitor the transplanted plants closely and provide regular watering and care as needed.
By following these tips, you can help minimize transplant shock and promote the healthy growth of your transplanted herb seedlings or established plants.
VIII. Providing the Right Growing Conditions for Herbs
When it comes to growing herbs in your kitchen garden, providing the right growing conditions is crucial for their success and productivity. In this section, we will discuss the sunlight requirements, watering needs and techniques, as well as temperature and humidity considerations for different herbs.
A. Sunlight requirements for different herbs
Herbs have varying sunlight requirements, and it’s important to understand the needs of each herb to ensure optimal growth. Some herbs thrive in full sun, while others prefer partial shade. Here are a few examples:
- Basil: Basil is a sun-loving herb that requires at least 6-8 hours of direct sunlight per day. It’s best to plant basil in a spot that receives full sun throughout the day.
- Mint: Mint can tolerate partial shade but prefers at least 4-6 hours of direct sunlight. It’s important to provide some shade during the hottest part of the day to prevent the leaves from wilting.
- Parsley: Parsley is a versatile herb that can tolerate both full sun and partial shade. However, it’s best to provide it with at least 4-6 hours of direct sunlight for optimal growth.
It’s important to note that these are general guidelines, and the sunlight requirements may vary slightly depending on your climate and specific growing conditions. Observe your herbs closely and make adjustments accordingly.
B. Watering needs and techniques for herbs
Proper watering is essential for the health and vitality of your herbs. Overwatering or underwatering can lead to root rot or dehydration, respectively. Here are some watering tips for different herbs:
- Rosemary: Rosemary prefers drier soil and is susceptible to root rot if overwatered. Allow the top inch of soil to dry out before watering again. Water deeply but infrequently to encourage deep root growth.
- Thyme: Thyme is a drought-tolerant herb that prefers well-draining soil. Water thyme when the top inch of soil feels dry, but avoid overwatering to prevent root rot.
- Chives: Chives prefer consistently moist soil. Water them when the top inch of soil feels dry. Avoid letting the soil dry out completely, as it can affect the flavor and growth of the herb.
Again, it’s important to monitor the moisture levels of your herbs’ soil and adjust the watering frequency based on their specific needs and the environmental conditions.
C. Temperature and humidity considerations
Temperature and humidity play a significant role in the growth and development of herbs. Different herbs have different temperature and humidity preferences. Here are some considerations:
- Basil: Basil thrives in warm temperatures between 70-90°F (21-32°C). It prefers moderate humidity levels around 50-70%. Avoid exposing basil to cold drafts or extremely low temperatures.
- Mint: Mint prefers cooler temperatures between 60-70°F (15-21°C). It can tolerate higher humidity levels, but good air circulation is essential to prevent fungal diseases.
- Parsley: Parsley is a cool-season herb that prefers temperatures between 50-70°F (10-21°C). It can tolerate moderate humidity levels but avoid excessive moisture, as it can lead to fungal issues.
It’s important to provide adequate ventilation and airflow to prevent the buildup of humidity and minimize the risk of fungal diseases. Additionally, protecting your herbs from extreme temperature fluctuations and frost is crucial for their survival.
By understanding and providing the right growing conditions, including sunlight, watering, temperature, and humidity, you can ensure the healthy growth and abundant harvest of your kitchen garden herbs. Remember to observe your herbs closely and make adjustments as needed to meet their specific needs.
IX. Fertilizing and Mulching Your Herb Garden
In order to ensure the healthy growth and abundant harvest of your herb garden, it is essential to provide the right nutrients and maintain proper moisture levels. Fertilizing and mulching play a crucial role in meeting these requirements. In this section, we will explore the importance of understanding herb nutrient requirements, choosing the right fertilizer for herbs, and implementing effective mulching techniques to conserve moisture and suppress weeds.
A. Understanding herb nutrient requirements
Herbs, like any other plants, require a balanced supply of nutrients to thrive. Understanding the specific nutrient requirements of herbs is key to providing them with the necessary elements for optimal growth. Different herbs have varying nutrient needs, but there are some general guidelines that can be followed.
Firstly, herbs generally prefer well-drained soil with a slightly acidic to neutral pH level. Conducting a soil test can help determine the pH level and identify any nutrient deficiencies. Most herbs thrive in soil with a pH range of 6.0 to 7.0.
Secondly, herbs require three primary nutrients: nitrogen (N), phosphorus (P), and potassium (K). Nitrogen promotes leafy growth, phosphorus aids in root development and flower production, and potassium enhances overall plant health and disease resistance. These nutrients can be supplied through organic or synthetic fertilizers.
Lastly, herbs also benefit from secondary nutrients such as calcium, magnesium, and sulfur, as well as trace elements like iron, manganese, and zinc. These micronutrients are essential for various physiological processes in herbs and can be provided through the use of fertilizers specifically formulated for herbs.
B. Choosing the right fertilizer for herbs
When it comes to fertilizing your herb garden, it is important to choose a fertilizer that meets the specific nutrient requirements of herbs. Organic fertilizers, such as compost and well-rotted manure, are excellent choices as they not only provide essential nutrients but also improve soil structure and enhance microbial activity.
Alternatively, synthetic fertilizers can be used, especially if there are specific nutrient deficiencies identified through soil testing. These fertilizers come in various formulations, such as granular, liquid, or slow-release, and provide a precise balance of nutrients for optimal herb growth.
When applying fertilizer, it is crucial to follow the manufacturer’s instructions regarding dosage and frequency. Over-fertilization can lead to nutrient imbalances and potential damage to the herbs. It is also advisable to apply fertilizers during the active growing season and avoid fertilizing during periods of dormancy.
C. Mulching techniques to conserve moisture and suppress weeds
Mulching is an effective technique to conserve moisture, suppress weeds, and maintain a stable soil temperature in your herb garden. By creating a protective layer on the soil surface, mulch helps retain moisture, reducing the need for frequent watering.
Organic mulches, such as straw, wood chips, or shredded leaves, are commonly used in herb gardens. These materials not only conserve moisture but also break down over time, enriching the soil with organic matter and nutrients.
Before applying mulch, it is important to prepare the soil by removing any existing weeds and loosening the top layer. This will prevent weed growth underneath the mulch layer. Apply a layer of mulch around 2 to 3 inches thick, ensuring it covers the entire herb garden bed.
Additionally, mulch can help regulate soil temperature by insulating the roots of the herbs. This is particularly beneficial in regions with extreme temperature fluctuations. Mulch also acts as a natural weed suppressant, preventing weed seeds from germinating and competing with the herbs for nutrients and moisture.
Regularly monitor the moisture levels in your herb garden and adjust watering accordingly. Mulch helps retain moisture, but it is important to ensure that the herbs receive adequate hydration, especially during dry periods.
In this section, we will explore the importance of pruning for herb growth and health, techniques for proper herb pruning, and harvesting herbs at the right time for optimal flavor and potency. As an experienced herb gardener, I have learned the significance of these practices firsthand and will share my insights and expertise with you.
A. Importance of pruning for herb growth and health
Pruning plays a crucial role in promoting the growth and overall health of herbs in your kitchen garden. By removing certain parts of the plant, such as dead or diseased leaves, stems, or branches, you can encourage new growth and prevent the spread of diseases. Pruning also helps maintain the desired shape and size of the herb plants, making them more aesthetically pleasing.
When pruning herbs, it is important to consider the specific needs of each herb variety. Some herbs, like basil and mint, benefit from regular pruning to prevent them from becoming leggy and encourage bushier growth. On the other hand, woody herbs like rosemary and thyme require less frequent pruning but still benefit from occasional trimming to remove dead or damaged parts.
Additionally, pruning can help improve air circulation and sunlight penetration within the herb plants, reducing the risk of fungal infections and promoting photosynthesis. It also allows you to harvest fresh leaves and stems for culinary purposes, ensuring a continuous supply of flavorful herbs in your kitchen.
B. Techniques for proper herb pruning
Proper pruning techniques are essential to ensure the health and vitality of your herb plants. Here are some guidelines to follow when pruning your herbs:
- Start by inspecting the herb plant for any dead, diseased, or damaged leaves, stems, or branches. These should be removed using clean and sharp pruning shears or scissors.
- Make clean cuts just above a leaf node or bud to encourage new growth. Avoid leaving stubs, as they can become entry points for diseases and pests.
- Prune herbs regularly to maintain their shape and prevent them from becoming too leggy. This is especially important for herbs that tend to grow quickly, such as basil and mint.
- Avoid pruning herbs during their dormant period, as this can disrupt their natural growth cycle. Instead, opt for pruning in early spring or after the herb has finished flowering.
- Remember to sanitize your pruning tools before and after each use to prevent the spread of diseases. You can do this by wiping the blades with rubbing alcohol or a bleach solution.
By following these techniques, you can ensure that your herb plants remain healthy, productive, and visually appealing throughout the growing season.
C. Harvesting herbs at the right time for optimal flavor and potency
Harvesting herbs at the right time is crucial to ensure that they possess the best flavor and potency. Here are some tips to help you harvest your herbs at their peak:
- Familiarize yourself with the specific harvesting guidelines for each herb variety. Some herbs, like cilantro and dill, are best harvested before they start flowering, as their flavor can become bitter afterwards.
- Harvest herbs in the morning when their essential oils are at their highest concentration. This is when they are most flavorful and aromatic.
- Use clean and sharp scissors or pruning shears to cut the herb stems just above a leaf node. Avoid tearing or bruising the leaves, as this can affect the quality of the harvested herbs.
- Regularly harvest herbs to encourage new growth and prevent them from becoming woody or leggy. This also ensures a continuous supply of fresh herbs for your culinary endeavors.
- Store harvested herbs properly to maintain their flavor and potency. Most herbs can be stored in airtight containers or wrapped in damp paper towels in the refrigerator for a few days. Alternatively, you can dry herbs by hanging them upside down in a well-ventilated area or using a dehydrator.
By harvesting your herbs at the right time and using proper storage methods, you can enjoy the full flavor and medicinal properties of your homegrown herbs in various culinary and therapeutic applications.