Contents
I. Introduction
Welcome to the ultimate Spring Cleaning Checklist for a Tidy Home! Are you ready to roll up your sleeves and give your living space a fresh start? Spring cleaning is the perfect opportunity to declutter, organize, and deep clean your home, leaving it feeling renewed and rejuvenated.
In this comprehensive guide, we will take you through a step-by-step checklist to ensure that no corner of your home is left untouched. From tackling the kitchen and bathroom to revamping your bedroom and living areas, we’ve got you covered.
But before we dive into the nitty-gritty of cleaning, let’s talk about the importance of spring cleaning. Spring is a season of new beginnings, and what better way to embrace this than by giving your home a thorough clean? Not only does spring cleaning help eliminate dust, allergens, and germs, but it also creates a fresh and inviting environment for you and your family.
Throughout this article, we will provide you with practical tips, tricks, and expert advice to make your spring cleaning journey as smooth and efficient as possible. We will also share some DIY cleaning solutions and eco-friendly alternatives to conventional cleaning products, ensuring that your cleaning process is both effective and environmentally friendly.
So, grab your cleaning supplies, put on your favorite playlist, and let’s get started on transforming your home into a clean and organized sanctuary!
II. Decluttering and Organizing

II. Decluttering and Organizing
Decluttering and organizing your home can be a daunting task, but with the right plan and approach, it can also be a rewarding and transformative experience. In this section, we will explore the steps you can take to sort and categorize your belongings, create a decluttering plan, and offer tips for organizing different areas of your home, including the kitchen, bedroom, living room, and bathroom.
A. Sorting and categorizing belongings
Before you can start organizing your home, it’s important to sort and categorize your belongings. This step will help you identify what you want to keep, what you can donate or sell, and what you should discard. Begin by going through each room and creating designated areas for different categories, such as clothes, books, electronics, and sentimental items. As you go through your belongings, ask yourself if each item brings you joy or serves a practical purpose. If not, consider letting it go.
Once you have sorted your belongings into categories, it’s time to further organize them. Invest in storage solutions such as bins, baskets, and shelves to keep items neatly organized and easily accessible. Label each container to make it easier to find what you need later on. Remember, the goal is to create a clutter-free and functional space.
B. Creating a decluttering plan
Creating a decluttering plan will help you stay focused and motivated throughout the process. Start by setting specific goals for each room or area of your home. Break down larger tasks into smaller, more manageable ones. For example, instead of tackling your entire kitchen in one day, focus on decluttering and organizing one cabinet or drawer at a time.
Allocate dedicated time for decluttering and stick to your schedule. Set realistic deadlines for each task to keep yourself accountable. Remember, decluttering is a process, and it may take time to achieve your desired results. Be patient with yourself and celebrate small victories along the way.
C. Tips for organizing different areas of the home
1. Kitchen organization
The kitchen is often one of the most cluttered areas of the home. To keep your kitchen organized, start by decluttering your countertops. Store appliances that you don’t use frequently in cabinets or on shelves. Utilize drawer dividers and organizers to keep utensils, cutlery, and other small items neatly arranged. Group similar items together, such as baking supplies, spices, and canned goods, to make them easier to find.
Consider investing in storage solutions specifically designed for the kitchen, such as pot racks, spice racks, and pantry organizers. These can help maximize space and keep everything within reach. Regularly clean out your refrigerator and pantry to get rid of expired or unused items. Keeping your kitchen organized will not only make cooking and meal prep more enjoyable but also save you time and frustration.
2. Bedroom organization
Your bedroom should be a peaceful and clutter-free space where you can relax and unwind. Start by decluttering your wardrobe. Donate or sell clothes and accessories that you no longer wear or love. Invest in storage solutions such as closet organizers, shoe racks, and under-bed storage containers to maximize space.
Keep your bedside table tidy by using drawer dividers or small baskets to store essentials like books, electronics, and skincare products. Create designated areas for jewelry, watches, and other accessories to prevent them from getting tangled or lost. Make your bed every morning to instantly make your bedroom look and feel more organized.
3. Living room organization
The living room is often the heart of the home, where family and friends gather. To keep your living room organized, start by decluttering surfaces such as coffee tables and side tables. Use decorative baskets or bins to store remote controls, magazines, and other frequently used items.
Invest in storage furniture such as bookshelves, TV stands, or ottomans with hidden storage compartments. These can help you keep your belongings organized while also adding style to your space. Arrange furniture in a way that promotes conversation and allows for easy movement. Keep cords and cables hidden or neatly organized using cable management solutions.
4. Bathroom organization
The bathroom is a space where organization is essential for a smooth morning routine. Start by decluttering your bathroom cabinets and drawers. Dispose of expired medications, beauty products, and old towels. Use drawer dividers or small containers to keep toiletries, makeup, and other essentials neatly organized.
Utilize vertical space by installing shelves or hanging organizers for towels, toiletries, and cleaning supplies. Keep your shower area clutter-free by using a shower caddy or hanging storage solutions. Regularly clean and disinfect your bathroom to maintain a hygienic and organized space.
By following these tips for decluttering and organizing different areas of your home, you can create a tidy and functional living environment. Remember, the key is to approach the process with patience and a clear plan. Happy organizing!
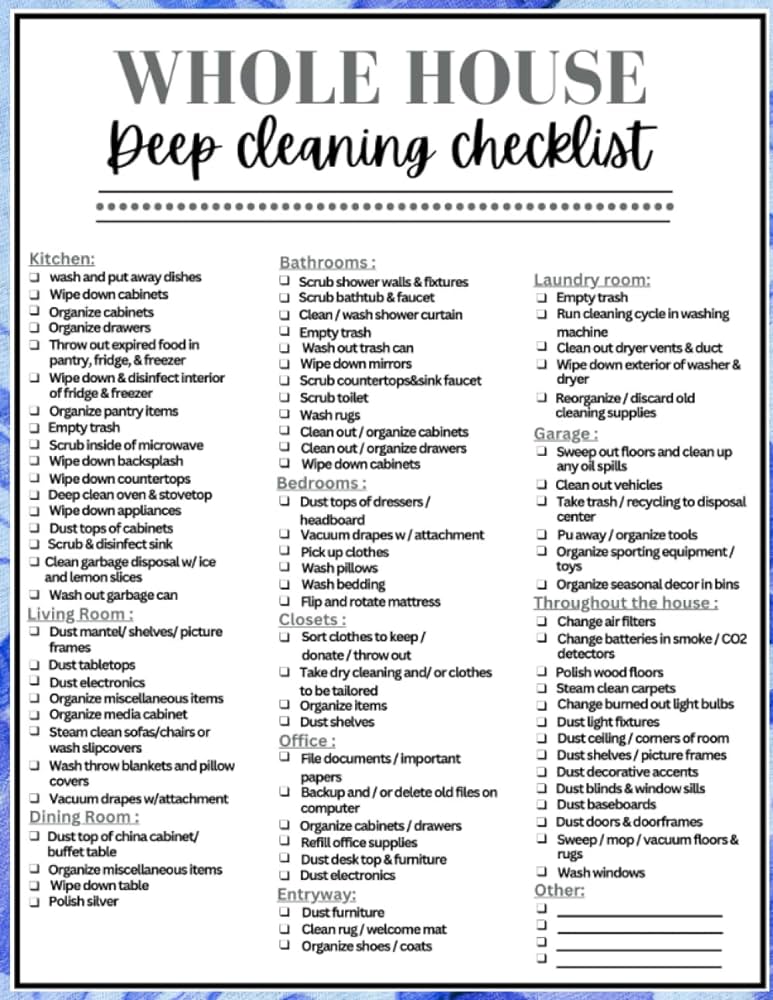
III. Deep Cleaning

Deep cleaning your home is an essential part of maintaining a tidy and healthy living space. It involves thorough cleaning of every nook and cranny, ensuring that even the hard-to-reach areas are spotless. In this section, we will discuss the cleaning supplies and tools needed for deep cleaning, as well as provide a room-by-room deep cleaning checklist.
A. Cleaning supplies and tools needed
Before you begin deep cleaning your home, it’s important to gather all the necessary cleaning supplies and tools. Here are some essential items you’ll need:
- All-purpose cleaner
- Glass cleaner
- Disinfectant spray
- Microfiber cloths
- Duster
- Broom and dustpan
- Vacuum cleaner
- Mop
- Scrub brush
- Gloves
- Bucket
Having these supplies on hand will make your deep cleaning process much more efficient and effective.
B. Room-by-room deep cleaning checklist
Now that you have all the necessary supplies, let’s go through a room-by-room deep cleaning checklist:
1. Kitchen deep cleaning
The kitchen is often one of the most used and dirtiest areas of the house. To deep clean your kitchen, follow these steps:
- Clear out and organize the pantry and cabinets.
- Empty and clean the refrigerator, including shelves and drawers.
- Clean the oven and stovetop, removing any grease or burnt-on food.
- Scrub the sink and faucet.
- Wipe down countertops and backsplash.
- Clean the inside and outside of the microwave.
- Wash dishes, utensils, and cookware.
- Sweep and mop the floor.
By following this checklist, your kitchen will be sparkling clean and ready for your next culinary adventure.
2. Bathroom deep cleaning
The bathroom is another area that requires thorough cleaning. Here’s how to deep clean your bathroom:
- Scrub the bathtub, shower, and tiles.
- Clean the toilet, including the bowl, seat, and tank.
- Wipe down the bathroom vanity and sink.
- Clean the mirrors and windows.
- Remove soap scum and grime from shower curtains or doors.
- Disinfect the bathroom fixtures.
- Empty and clean the trash can.
- Sweep and mop the floor.
With these steps, your bathroom will be fresh and hygienic, providing a clean space for your daily routines.
3. Bedroom deep cleaning
Your bedroom should be a sanctuary for relaxation and rest. To deep clean your bedroom, follow these steps:
- Remove and wash bedding, including sheets, pillowcases, and comforters.
- Dust and wipe down furniture, including nightstands and dressers.
- Vacuum or sweep the floor, paying attention to corners and under furniture.
- Clean mirrors and windows.
- Organize and declutter your closet.
- Wipe down light fixtures and lampshades.
- Remove any cobwebs from corners and ceilings.
By deep cleaning your bedroom, you’ll create a peaceful and clean environment that promotes better sleep and relaxation.
4. Living room deep cleaning
The living room is where you spend quality time with family and friends. To deep clean your living room, follow these steps:
- Dust and wipe down all surfaces, including coffee tables and shelves.
- Vacuum or clean upholstered furniture.
- Clean electronics, such as the TV and speakers.
- Wash or vacuum curtains and blinds.
- Clean windows and mirrors.
- Remove any stains from carpets or rugs.
- Organize and declutter any toys or magazines.
With a clean and organized living room, you’ll create a welcoming space for relaxation and entertainment.
Deep cleaning your home may seem like a daunting task, but by following this room-by-room checklist and using the right cleaning supplies and tools, you’ll be able to achieve a tidy and fresh living space. Remember to take breaks and pace yourself to avoid burnout. Happy cleaning!
IV. Furniture and Upholstery Care
When it comes to maintaining a tidy home, taking care of your furniture and upholstery is essential. Proper cleaning and maintenance not only prolong the lifespan of your furniture but also keep it looking its best. In this section, we will discuss how to clean and maintain different types of furniture, including wood furniture, leather furniture, and fabric upholstery. We will also provide tips on removing stains and odors from furniture.
A. Cleaning and maintaining different types of furniture
1. Wood furniture care: Wood furniture adds a touch of elegance to any home, but it requires regular care to preserve its beauty. Start by dusting your wood furniture regularly using a soft cloth or a feather duster. Avoid using abrasive cleaners or harsh chemicals that can damage the wood’s finish. Instead, opt for a mild soap and water solution or a specialized wood cleaner. Apply the cleaner with a soft cloth, following the wood’s grain, and then wipe it dry. To protect the wood from scratches and moisture, use coasters, placemats, and tablecloths.
2. Leather furniture care: Leather furniture is luxurious and durable, but it requires specific care to maintain its appearance and prevent cracking or fading. Start by dusting your leather furniture regularly using a soft cloth or a vacuum cleaner with a brush attachment. Avoid placing leather furniture in direct sunlight or near heat sources, as this can cause the leather to dry out and crack. To clean leather, use a mild soap and water solution or a specialized leather cleaner. Apply the cleaner with a soft cloth, gently rubbing the leather in circular motions. After cleaning, apply a leather conditioner to moisturize and protect the leather.
3. Fabric upholstery care: Fabric upholstery adds comfort and style to your home, but it can easily accumulate dirt, stains, and odors. Start by vacuuming your fabric upholstery regularly to remove loose dirt and debris. Use a brush attachment to gently lift the fibers and reach into crevices. To remove stains, check the manufacturer’s instructions for specific cleaning recommendations. In general, most fabric upholstery can be spot cleaned using a mild detergent and water. Blot the stain gently with a clean cloth, working from the outside in to prevent spreading. For stubborn stains or overall deep cleaning, consider hiring a professional upholstery cleaner.
B. Removing stains and odors from furniture
Stains and odors can be a common issue with furniture, but with the right techniques, you can effectively remove them. Here are some tips:
- For food and beverage stains: Blot the stain immediately with a clean cloth to absorb as much liquid as possible. Avoid rubbing, as it can push the stain deeper into the fabric or upholstery. Mix a solution of mild detergent and water, and gently dab the stain with a clean cloth. Rinse the area with clean water and blot dry.
- For pet stains: If you have pets, accidents happen. Start by blotting the stain with a clean cloth to remove any excess moisture. Mix a solution of white vinegar and water, and apply it to the stain. Blot the area with a clean cloth, and rinse with water. For lingering odors, sprinkle baking soda on the affected area, let it sit for a few hours, and then vacuum it up.
- For musty odors: Musty odors can develop in furniture that has been stored or exposed to moisture. To remove these odors, sprinkle baking soda on the furniture’s surface and let it sit for a few hours. Vacuum the baking soda thoroughly, and repeat if necessary. You can also place odor-absorbing products, such as activated charcoal or coffee grounds, near the furniture to help eliminate odors.
By following these tips and incorporating them into your spring cleaning routine, you can ensure that your furniture and upholstery stay clean, fresh, and in excellent condition for years to come.
V. Carpet and Flooring Maintenance

In this section, we will discuss the essential steps to maintain and care for your carpets, hardwood floors, and tile and grout. By following these tips, you can ensure that your flooring remains clean, fresh, and in excellent condition for years to come.
A. Vacuuming and Steam Cleaning Carpets
Regular vacuuming is crucial for keeping your carpets clean and free from dirt, dust, and allergens. Aim to vacuum at least once a week, focusing on high-traffic areas and spots prone to spills or stains. Use a vacuum cleaner with a rotating brush or beater bar to effectively remove embedded dirt and debris.
In addition to regular vacuuming, steam cleaning is an excellent way to deep clean your carpets and eliminate stubborn stains. Steam cleaning uses hot water and a cleaning solution to penetrate the carpet fibers, loosening dirt and grime. It is recommended to steam clean your carpets every 6 to 12 months, depending on the level of foot traffic in your home.
When steam cleaning, make sure to follow the manufacturer’s instructions for your specific carpet type. Start by thoroughly vacuuming the carpet to remove loose dirt. Then, fill the steam cleaner with hot water and the appropriate cleaning solution. Move the steam cleaner slowly and evenly over the carpet, allowing the steam and suction to extract dirt and moisture. After steam cleaning, allow the carpet to dry completely before walking on it.
B. Cleaning and Polishing Hardwood Floors
Hardwood floors add warmth and elegance to any home, but they require regular maintenance to preserve their beauty. Here are some tips for cleaning and polishing hardwood floors:
- Sweep or dust mop your hardwood floors daily to remove loose dirt and debris.
- Use a pH-neutral hardwood floor cleaner and a microfiber mop to clean the floors. Avoid using excessive water, as it can damage the wood.
- For stubborn stains, use a hardwood floor cleaner specifically designed for removing stains without damaging the finish.
- Periodically, apply a hardwood floor polish to restore shine and protect the wood. Follow the manufacturer’s instructions for application.
- Place mats at entryways to prevent dirt and grit from being tracked onto the hardwood floors.
- Avoid wearing high heels or shoes with sharp edges on hardwood floors, as they can cause scratches.
By following these steps, you can keep your hardwood floors looking beautiful and extend their lifespan.
C. Maintaining Tile and Grout Cleanliness
Tile floors are durable and easy to clean, but the grout lines can be a magnet for dirt, stains, and mildew. Here are some tips to maintain the cleanliness of your tile and grout:
- Sweep or vacuum your tile floors regularly to remove loose dirt and debris.
- Use a pH-neutral tile cleaner and a soft-bristle brush to clean the tile surface. Avoid using abrasive cleaners or scrub brushes, as they can scratch the tile.
- For stubborn stains or mildew, create a paste using baking soda and water. Apply the paste to the stained areas and scrub gently with a soft brush. Rinse thoroughly with water.
- To keep the grout lines clean and prevent staining, apply a grout sealer once a year. The sealer creates a protective barrier that repels dirt and spills.
- Avoid using excessive water when cleaning tile floors, as it can seep into the grout and cause it to deteriorate over time.
By following these maintenance tips, you can keep your tile floors looking fresh and prevent grout discoloration or damage.
Remember, proper maintenance and regular cleaning are essential for preserving the beauty and longevity of your carpets, hardwood floors, and tile. By incorporating these practices into your cleaning routine, you can enjoy a clean and tidy home with flooring that looks and feels its best.
VI. Window and Glass Cleaning
When it comes to spring cleaning, one area that often gets overlooked is the windows and glass surfaces in our homes. However, cleaning these areas is essential for maintaining a tidy and bright living space. In this section, I will share some tips and techniques for effectively cleaning windows inside and out, removing streaks and smudges from glass surfaces, and cleaning window blinds and curtains.
A. Cleaning windows inside and out
Cleaning windows may seem like a daunting task, but with the right tools and techniques, it can be a breeze. Here’s how you can clean your windows inside and out:
- Start by removing any dust or dirt from the window frames and sills using a soft brush or vacuum cleaner attachment.
- Next, prepare a solution of warm water and mild dish soap in a bucket or spray bottle.
- Dip a sponge or microfiber cloth into the soapy water and wring out any excess liquid.
- Begin cleaning the window glass by wiping it in a circular motion, starting from the top and working your way down.
- For stubborn stains or grime, you can use a glass cleaner or a mixture of equal parts vinegar and water.
- After cleaning the glass, use a squeegee to remove the excess water and prevent streaks.
- Finally, dry the window frames and sills with a clean, lint-free cloth.
Remember to clean both the inside and outside of your windows for a thorough cleaning. If you have multiple floors, consider using a ladder or an extendable window cleaning tool to reach higher windows safely.
B. Removing streaks and smudges from glass surfaces
Glass surfaces, such as mirrors and glass tabletops, can easily accumulate streaks and smudges. To remove these unsightly marks, follow these steps:
- Start by dusting the glass surface with a microfiber cloth or a feather duster to remove any loose dirt or debris.
- Next, dampen a clean microfiber cloth with a glass cleaner or a mixture of vinegar and water.
- Gently wipe the glass surface in a circular motion, focusing on the areas with streaks or smudges.
- For stubborn marks, you can use a specialized glass cleaning product or a solution of rubbing alcohol and water.
- After cleaning, use a dry microfiber cloth to buff the glass surface and remove any remaining streaks or residue.
Regularly cleaning glass surfaces will not only keep them looking pristine but also enhance the overall appearance of your home.
C. Cleaning window blinds and curtains
Window blinds and curtains can accumulate dust and allergens over time, so it’s important to include them in your spring cleaning routine. Here’s how you can clean them effectively:
- For window blinds, start by closing them fully and using a feather duster or a microfiber cloth to remove any loose dust.
- If your blinds are made of a durable material, such as aluminum or vinyl, you can wipe them down with a damp cloth or sponge.
- For fabric blinds, check the care instructions and consider spot cleaning or vacuuming them using a brush attachment.
- When it comes to curtains, check the care label for any specific cleaning instructions.
- Most curtains can be machine washed on a gentle cycle using a mild detergent.
- Alternatively, you can remove dust and freshen up curtains by using a fabric steamer or a handheld garment steamer.
- Remember to iron or steam curtains while they are still slightly damp to remove any wrinkles.
By regularly cleaning your window blinds and curtains, you can maintain a clean and allergen-free environment in your home.
With these tips and techniques, you can tackle the task of window and glass cleaning with confidence. Remember to prioritize safety and use appropriate tools and cleaning solutions for each surface. By incorporating these steps into your spring cleaning routine, you can enjoy sparkling clean windows and glass surfaces that enhance the overall appearance of your home.
VII. Kitchen Appliance Cleaning
Keeping your kitchen appliances clean is essential for maintaining their performance and extending their lifespan. In this section, we will discuss the proper cleaning methods for three essential kitchen appliances: the refrigerator and freezer, oven and stovetop, and dishwasher.
A. Cleaning the refrigerator and freezer
1. Empty and defrost: Start by removing all the food from your refrigerator and freezer. Discard any expired or spoiled items. Turn off the appliances and allow them to defrost completely.
2. Remove shelves and drawers: Take out the shelves, drawers, and any removable parts from the refrigerator and freezer. Wash them with warm soapy water and rinse thoroughly. Dry them before putting them back in.
3. Wipe interior surfaces: Use a mixture of equal parts water and vinegar or a mild detergent to clean the interior surfaces of the refrigerator and freezer. Pay special attention to spills and stains. Use a soft cloth or sponge to wipe the surfaces and remove any dirt or grime.
4. Clean the door seals: The door seals are prone to collecting dirt and debris. Use a toothbrush or a small brush to clean the seals gently. Make sure they are free from any residue that could affect their sealing ability.
5. Clean the exterior: Wipe the exterior surfaces of the refrigerator and freezer with a damp cloth. Use a mild cleaner if necessary, but avoid abrasive cleaners that could damage the finish.
B. Oven and stovetop cleaning
1. Remove oven racks: Take out the oven racks and soak them in warm soapy water. Scrub them gently to remove any baked-on grease or food particles. Rinse and dry them before putting them back in.
2. Clean the oven interior: If your oven has a self-cleaning function, follow the manufacturer’s instructions to activate it. Otherwise, use an oven cleaner or a mixture of baking soda and water to clean the interior. Apply the cleaner and let it sit for the recommended time before wiping it away with a damp cloth.
3. Clean the stovetop: For electric stovetops, remove the burners and wipe the surface with a damp cloth. For gas stovetops, remove the grates and clean them separately. Use a non-abrasive cleaner to remove any stains or spills.
4. Clean the control knobs and buttons: Wipe the control knobs and buttons with a damp cloth. Use a toothbrush or a cotton swab to clean hard-to-reach areas.
5. Polish the exterior: Use a stainless steel cleaner or a mixture of vinegar and water to polish the exterior surfaces of your oven and stovetop. Buff them with a soft cloth to restore their shine.
C. Dishwasher maintenance and cleaning
1. Clean the filter: The dishwasher filter traps food particles and debris. Remove the filter and rinse it under running water to remove any residue. Use a toothbrush to scrub away stubborn dirt.
2. Wipe the interior: Use a damp cloth or sponge to wipe the interior surfaces of the dishwasher. Pay attention to the door, racks, and spray arms. Remove any food particles or stains.
3. Run a cleaning cycle: Some dishwashers have a self-cleaning cycle. If yours does, follow the manufacturer’s instructions to activate it. Otherwise, you can run an empty cycle with a dishwasher cleaner or a cup of vinegar placed on the top rack.
4. Clean the exterior: Wipe the exterior surfaces of the dishwasher with a damp cloth. Use a mild cleaner if necessary, but avoid abrasive cleaners that could damage the finish.
5. Check the seals: Inspect the door seals for any signs of damage or mold. Clean them with a mixture of water and vinegar to remove any residue. Ensure that the seals are intact and provide a tight seal when the dishwasher is closed.
By following these cleaning tips, you can keep your kitchen appliances in top shape and ensure their optimal performance. Regular maintenance and cleaning will not only extend their lifespan but also contribute to a clean and hygienic kitchen environment.
VIII. Air Quality Improvement
In order to maintain a healthy and comfortable living environment, it is important to prioritize air quality in your home. Poor air quality can lead to various health issues, including allergies, respiratory problems, and even long-term health risks. Fortunately, there are several steps you can take to improve the air quality in your home. In this section, we will discuss three effective methods: changing air filters, cleaning air vents and ducts, and using air purifiers and houseplants.
A. Changing air filters
One of the simplest and most effective ways to improve air quality is by regularly changing your air filters. Air filters are designed to trap dust, pollen, pet dander, and other airborne particles, preventing them from circulating in your home. Over time, these filters can become clogged and less effective, so it is important to replace them on a regular basis.
When choosing air filters, look for high-quality options that are specifically designed to remove allergens and improve air quality. There are different types of air filters available, including fiberglass, pleated, and electrostatic filters. Each type has its own advantages and disadvantages, so it is important to choose the one that best suits your needs.
It is recommended to change your air filters every three months, or more frequently if you have pets or allergies. Regularly replacing your air filters will not only improve air quality but also help your HVAC system run more efficiently, saving you money on energy bills.
B. Cleaning air vents and ducts
In addition to changing air filters, it is important to clean your air vents and ducts regularly. Over time, dust, dirt, and other debris can accumulate in these areas, reducing air quality and hindering the performance of your HVAC system.
You can start by removing the vent covers and using a vacuum cleaner with a brush attachment to remove any visible dust and debris. For a more thorough cleaning, consider hiring a professional duct cleaning service. They have the necessary tools and expertise to clean your ducts effectively, removing built-up dirt and improving air quality.
Regularly cleaning your air vents and ducts will not only improve air quality but also help prevent the spread of allergens and contaminants throughout your home. It is especially important to clean these areas if you or your family members suffer from allergies or respiratory conditions.
C. Using air purifiers and houseplants for better air quality
In addition to changing air filters and cleaning air vents and ducts, you can further improve air quality in your home by using air purifiers and houseplants. Air purifiers are designed to remove pollutants and allergens from the air, helping to create a cleaner and healthier living environment.
When choosing an air purifier, look for one that is suitable for the size of the room and has a high-efficiency particulate air (HEPA) filter. HEPA filters are capable of trapping small particles, such as dust mites, pollen, and pet dander, ensuring that the air you breathe is clean and free from allergens.
In addition to air purifiers, houseplants can also help improve air quality by naturally filtering and purifying the air. Certain plants, such as spider plants, peace lilies, and snake plants, are known for their ability to remove toxins and produce oxygen. By incorporating these plants into your home decor, you can enhance air quality and create a more inviting and refreshing atmosphere.
Remember to regularly water and care for your houseplants to ensure their optimal performance. Additionally, it is important to choose plants that are safe for pets and children, as some plants can be toxic if ingested.
IX. Outdoor Cleaning and Maintenance
A. Cleaning outdoor furniture
Outdoor furniture is a great addition to any home, providing a comfortable and inviting space to relax and entertain. However, over time, outdoor furniture can accumulate dirt, dust, and grime, making it look dull and unappealing. To keep your outdoor furniture looking its best, regular cleaning is essential.
Start by removing any loose debris, such as leaves or twigs, from the furniture. Use a brush or broom to sweep away the dirt and dust. Next, mix a solution of mild dish soap and warm water in a bucket. Dip a soft cloth or sponge into the soapy water and gently scrub the furniture, paying attention to any stains or stubborn dirt. Rinse the furniture thoroughly with a hose, making sure to remove all soap residue. Allow the furniture to air dry completely before using it again.
For specific materials like wood or metal, there are additional cleaning methods you can use. For wooden furniture, consider using a wood cleaner or a mixture of vinegar and water to remove stains and restore its natural shine. For metal furniture, use a metal cleaner or a mixture of baking soda and water to remove rust and restore its luster.
B. Pressure washing exterior surfaces
Pressure washing is an effective way to clean and maintain the exterior surfaces of your home, including the walls, deck, patio, and driveway. It uses high-pressure water to remove dirt, grime, mold, and mildew, leaving your surfaces looking clean and refreshed.
Before you start pressure washing, it’s important to prepare the area. Remove any furniture, plants, or other objects that could be damaged by the high-pressure water. Cover nearby plants and delicate surfaces with plastic or tarps to protect them.
When using a pressure washer, start with a low-pressure setting and gradually increase the pressure as needed. Hold the nozzle about 12 inches away from the surface and move it in a sweeping motion to ensure even cleaning. Pay special attention to areas with stubborn stains or buildup.
It’s important to note that not all surfaces can withstand the high pressure of a pressure washer. Avoid using a pressure washer on delicate materials like wood or vinyl siding, as it can cause damage. If you’re unsure about whether a surface can be pressure washed, it’s best to consult a professional.
C. Maintaining the garden and yard
A well-maintained garden and yard can enhance the overall appearance of your home and create a welcoming outdoor space. Regular maintenance is key to keeping your garden and yard looking their best.
Start by mowing the lawn regularly to keep it neat and tidy. Set the mower blades to the appropriate height for your grass type and avoid cutting it too short, as this can stress the grass and make it more susceptible to weeds and diseases. Trim the edges of the lawn for a clean and polished look.
Water your plants and lawn regularly, especially during dry periods. Use a sprinkler or a watering can to ensure even coverage. Avoid overwatering, as this can lead to root rot and other issues. Mulch around plants to help retain moisture and suppress weeds.
Prune shrubs and trees as needed to maintain their shape and promote healthy growth. Remove any dead or diseased branches to prevent the spread of diseases. Weed regularly to keep your garden beds free from unwanted plants.
Finally, consider adding fertilizers or compost to nourish your plants and promote their growth. Follow the instructions on the packaging to ensure proper application.
By following these tips for outdoor cleaning and maintenance, you can keep your outdoor furniture, exterior surfaces, garden, and yard in top shape, creating a beautiful and inviting outdoor space for you and your family to enjoy.
When it comes to maintaining a tidy home, safety should always be a top priority. Regular safety and maintenance checks can help prevent accidents and ensure that your home is in good working order. In this section, we will discuss three important areas that should be included in your spring cleaning checklist: testing smoke detectors and carbon monoxide alarms, inspecting electrical outlets and cords, and checking and replacing light bulbs.
A. Testing smoke detectors and carbon monoxide alarms
Smoke detectors and carbon monoxide alarms are essential safety devices that can save lives. It is important to test these alarms regularly to ensure that they are functioning properly. Here are some steps you can follow:
- Start by pressing the test button on each smoke detector and carbon monoxide alarm. This will trigger the alarm sound, indicating that the device is working.
- If the alarm does not sound, replace the batteries and test it again. If it still doesn’t work, it may be time to replace the device altogether.
- Make sure that smoke detectors are installed on every level of your home, including inside and outside sleeping areas. Carbon monoxide alarms should be placed near sleeping areas as well.
- Check the expiration date on your carbon monoxide alarms. Most alarms have a lifespan of 5-7 years and will need to be replaced after this time.
By regularly testing your smoke detectors and carbon monoxide alarms, you can ensure that they are working properly and provide early warning in the event of a fire or carbon monoxide leak.
B. Inspecting electrical outlets and cords
Electrical outlets and cords can pose a safety hazard if they are damaged or worn out. Regular inspections can help identify potential issues and prevent electrical accidents. Here’s what you should do:
- Check all electrical outlets in your home for signs of damage, such as cracks, loose fittings, or discoloration. If you notice any issues, it is important to have them repaired by a qualified electrician.
- Inspect electrical cords for fraying, exposed wires, or other damage. Damaged cords should be replaced immediately to avoid the risk of electrical shock or fire.
- Avoid overloading electrical outlets by using power strips or extension cords. Make sure to distribute the load evenly and never exceed the recommended wattage.
- Keep electrical cords away from heat sources and avoid running them under carpets or rugs, as this can cause them to overheat and pose a fire hazard.
By regularly inspecting your electrical outlets and cords, you can ensure that they are in good condition and minimize the risk of electrical accidents.
C. Checking and replacing light bulbs
Proper lighting is essential for a safe and comfortable home. Checking and replacing light bulbs as needed can help maintain a well-lit environment. Here are some tips:
- Inspect all light fixtures in your home and replace any burnt-out bulbs. Make sure to use the correct wattage for each fixture to prevent overheating.
- Consider replacing traditional incandescent bulbs with energy-efficient LED bulbs. LED bulbs last longer and consume less energy, helping you save on electricity bills.
- Pay attention to the color temperature of the bulbs you choose. Warm white bulbs create a cozy atmosphere, while cool white bulbs are better for task lighting.
- Don’t forget to clean your light fixtures regularly to remove dust and dirt, which can reduce the amount of light they emit.
By checking and replacing light bulbs as needed, you can ensure that your home is well-lit and create a comfortable and inviting atmosphere.
Remember, safety should always be a priority when it comes to maintaining your home. By including these safety and maintenance checks in your spring cleaning checklist, you can ensure that your home is not only tidy but also a safe place for you and your family.